放牛的

放牛的日子,是人生初恋的诗...

0%

常见的冒泡排序,基本都是这么写的(摘自维基百科):

1
2
3
4
5
6
7
8
9
10
11
12
13
14
15
16
17
18
19
private int[] bubbleSort(int[] array) {
int temp;
for (int i = 0; i < array.length - 1; i++) {
boolean Flag = false; // 是否发生交换。没有交换,提前跳出外层循环
for (int j = 0; j < array.length - 1 - i; j++) {
if (array[j] > array[j + 1]) {
temp = array[j];
array[j] = array[j + 1];
array[j + 1] = temp;
Flag = true;
}
}
if (!Flag)
{
break;
}
}
return array;
}

这样理解上,经常会有困难,为什么这样写的是对的?总感觉不太直观。

我试着换了种写法:

1
2
3
4
5
6
7
8
9
10
11
12
13
14
15
public static int[] bubbleSort(int[] nums) {
// i is the begin of sorted range, from nums.length ~ 1
for (int i = nums.length; i > 1; i--) {
// j is the next max value pointer
for (int j = 1; j < i; j++) {
int n = nums[j];
// swap if the bubble > the next
if (n < nums[j - 1]) {
nums[j] = nums[j - 1];
nums[j - 1] = n;
}
}
}
return nums;
}

我的理解思路是这样的:

  • 和插入排序类似,冒泡排序也分为排序好的部分 和 未排序的部分
  • 排序好的部分放在右侧,开始为0个,即索引为nums.length
    • 排序好的部分索引范围:[i, nums.length)
    • 每冒一次泡,多一个元素加入排序好的部分,即索引左移1位
    • 当i到第2个元素的时候,就不需要执行了,即 i == 1 不需要执行
  • 未排序好的部分放在左侧,每次从第2个元素开始,与前一个比较,直到未排序的最后一个元素
    • 未排序的部分索引范围:[0, i)
    • 从第2个元素开始,即 j = 1开始,到未排序的最后一个元素,即 i - 1为止
    • 与前一个元素比较,根据需要交换

当然,可以在这个版本上,加上已经全部有序的验证:

1
2
3
4
5
6
7
8
9
10
11
12
13
14
15
16
17
18
19
20
21
22
23
24
public static int[] bubbleSortWithSwapCheck(int[] nums) {
// bubble sort, add has swap check

// i is the begin of sorted range, from nums.length ~ 1,
for (int i = nums.length; i > 1; i--) {
// check has swap
boolean hasSwap = false;
// j is the next max value pointer
for (int j = 1; j < i; j++) {
int n = nums[j];
// swap if the bubble > the next
if (n < nums[j - 1]) {
nums[j] = nums[j - 1];
nums[j - 1] = n;
hasSwap = true;
}
}

if (!hasSwap) {
break;
}
}
return nums;
}

类似的,还可以进一步优化,缩短外层循环:

1
2
3
4
5
6
7
8
9
10
11
12
13
14
15
16
17
18
19
20
21
22
23
24
25
26
public static int[] bubbleSortWithSwapIndex(int[] nums) {
// bubble sort, add has swap check, add the sorted range

// i is the begin of sorted range, from nums.length ~ 1,
for (int i = nums.length; i > 1; ) {
// swap index
int swapIndex = 0;
// j is the next max value pointer
for (int j = 1; j < i; j++) {
int n = nums[j];
// swap if the bubble > the next
if (n < nums[j - 1]) {
nums[j] = nums[j - 1];
nums[j - 1] = n;
swapIndex = j;
}
}

if (swapIndex == 0) {
break;
} else {
i = swapIndex;
}
}
return nums;
}

公司建体验账号,不希望密码被改掉,又需要显示改密码功能,数据库用的是PostgreSQL。

于是,找到了这篇文章:PostgreSQL: 禁止表上数据更新或删除的方法:https://www.postgres.fun/20120810153010.html

该文中提到了2种方法,都是限定整张表的。而我们只想限定表中预置数据不能修改删除,于是做了以下测试:

1
2
3
4
5
6
7
8
9
10
11
12
13
14
15
16
17
18
19
20
21
22
23
24
25
26
27
28
29
30
31
32
33
34
35
36
37
38
39
40
-- 建测试表
CREATE TABLE "public"."test_user" (
"id" int8 NOT NULL,
"name" varchar(255) COLLATE "pg_catalog"."default",
"password" varchar(255) COLLATE "pg_catalog"."default"
);
ALTER TABLE "public"."test_user" ADD CONSTRAINT "user_pkey" PRIMARY KEY ("id");


-- 插入预置数据
INSERT INTO "public"."test_user" VALUES (1, 'a', 'aaa');
INSERT INTO "public"."test_user" VALUES (2, 'b', 'bbb');
INSERT INTO "public"."test_user" VALUES (3, 'c', 'ccc');


-- 创建失败时执行的触发函数
CREATE OR REPLACE FUNCTION func_test_trigger()
RETURNS trigger
LANGUAGE plpgsql
AS $function$
BEGIN
RAISE EXCEPTION 'Attention: can not update or delete table test_trigger,Please contact francs !';
END;
$function$;


-- 建触发器,根据id限定行
create trigger trigger_test_trigger_update BEFORE UPDATE ON test_user FOR EACH ROW WHEN (OLD.id in (1, 2, 3)) EXECUTE PROCEDURE func_test_trigger();
create trigger trigger_test_trigger_delete BEFORE DELETE ON test_user FOR EACH ROW WHEN (OLD.id in (1, 2, 3)) EXECUTE PROCEDURE func_test_trigger();

-- 限定行修改、删除时报错
UPDATE test_user set name = '123' where id = 1; -- 执行报错
DELETE FROM test_user WHERE id = 2; -- 执行报错

-- 可以插入新的行
INSERT INTO "public"."test_user" VALUES (4, 'd', 'ddd'); -- 成功

-- 新的行可以修改、删除
UPDATE test_user set name = '123' where id = 4; -- 成功
DELETE FROM test_user WHERE id = 4; -- 成功

关于Raft共识算法,网上资料很多,看完了往往还是一头雾水。

有2个很好的站点,可以动态的观察Raft执行过程:

关于为什么取名为Raft,特地查了一下,在Google groups里面找到了答案:

People ask me why it’s called “Raft” every now and then, and I didn’t have anything public on that until now. I wrote this up earlier in the year in a private email. I want a URL for it, so I’m sending it here and spamming all of you.

There’s a few reasons we came up with the name Raft:

- It’s not quite an acronym, but we were thinking about the words ‘reliable’, ‘replicated’, ‘redundant’, and ‘fault-tolerant’.

- We were thinking about logs and what can be built using them.

- We were thinking about the island of Paxos and how to escape it.

As a plus, we were using the randomly generated name Cheesomi in the paper before we came up with the name Raft in September 2012. The name appeared just over 100 times in our paper submission back then, so switching to the shorter name actually helped shrink the paper down quite a bit.

If you want even more detail, we had trouble coming up with a good name, so we made it an explicit agenda item during a RAMCloud meeting. I found two photos of the whiteboard during/after that meeting that I attached here. Looks like the top contenders were Raft, Knox (as in Fort Knox, I guess), Redundo, and Cloudsense (no clue). I don’t remember the details of how we ended up with Raft, since it didn’t obviously win the vote, but I do remember the name caught on really quickly. People seemed to like it almost right away. I’m so fucking glad it’s not called Redundo.

Thanks for listening,

Diego

1. Raft共识算法用来解决什么问题?

简言之,用来解决分布式存储一致性的问题。用来协调集群节点答成共识。

2. Raft怎么做到的?

主要通过2件事:Leader选举 和 日志复制。

2.1 Leader选举

  • 节点状态
    • 角色(state)
      • Follower
      • Candidate
      • Leader
    • 任期(term)
      • 递增的数字,每一次选举,增1
    • 日志索引(log index)
      • 递增的数字,每一次请求增1
  • 2个超时时间
    • Candidate timeout
      • Follower、Candidate没有收到心跳时
    • heartbeat timeout
      • Leader每隔该时间,固定发送心跳包
  • 角色变更
    • 开始:全部是Follower
    • Follower
      • 选举超时:从Follower变成Candidate
    • Candidate
      • 收到多数节点票数:从Candidate变成Leader
      • 发现当前Leader 或 更新的Term:从Candidate 变成 Follower
    • Leader
      • 发现拥有更高Term或更大Index的节点:从Leader变成Follower
  • 消息
    • Request Vote(Candidate发起,请求投票)
      • 发起方:Candidate
      • 请求:term,index
      • 返回:投票 1 或 0
    • Append Entries(Leader发起,心跳)
      • 发起方:Leader
      • 请求:term,index,entries
      • 返回:

2.2 日志复制

  • Leader收到Client请求
  • Leader先写自己的Uncommitted日志
  • 下一次心跳将数据发送到Follower
  • Leader收到多数Follower写uncommitted成功,Leader 改为Committed,并返回客户端成功
  • 下一次心跳,Follower改为Committed

你是否有过这样的经历:MySQL中误删了数据,数据没有备份,bin-log还没开。

我今天刚经历了一次,因为是测试环境,一般认为数据丢了也没关系。

但误删数据,总是会带来麻烦,有备无患。

备份分2步:写个备份的Shell脚本、配置cron。

Shell脚本

我把脚本写在/usr/bin/mysql_backup.sh文件中,

并给它可执行权限chmod +X /usr/bin/mysql_backup.sh

脚本内容如下:

1
2
3
4
5
6
7
8
9
10
11
12
13
#!/bin/bash
echo 'start backup mysql...';

echo 'create directory[/root/mysql_backup] if not exist...';
mkdir -p /root/mysql_backup;

echo 'backup mysql to [/root/mysql_backup] directory...';
mysqldump -u root -pPassword --all-databases > /root/mysql_backup/all_$( date +"%Y_%m_%d" ).sql;

echo 'delete old backup files';
find /root/mysql_backup -type f -mtime +10 -exec rm {} \;

echo 'backup mysql finish';

配置CRON

修改/etc/crontab文件,加入下行:

1
0 5 * * * root /usr/bin/mysql_backup.sh

这样,每天5点,以root用户执行该脚本。

1. 仓库初始化

1.1 准备空文件夹

为了探索git,我们建一个新的文件夹,在这里,可以随便怎么搞

1
2
3
4
5
6
7
8
9
10
11
12
# 删除临时文件夹(如果存在的话),创建一个临时文件夹,并进入 
➜ rm -rf tmp && mkdir tmp && cd $_

# 显示当前文件夹的路径
➜ pwd
/Users/lewis/tmp

# 目前,里面是空的,一个空文件夹准备好了
➜ ls -al
total 0
drwxr-xr-x 2 lewis staff 64 3 4 09:47 .
drwxr-xr-x+ 128 lewis staff 4096 3 4 09:48 ..

1.2 git初始化

1
2
3
4
5
6
7
8
9
10
11
12
13
14
15
16
17
18
19
20
21
22
23
# 在这个文件夹中,建立git仓库
➜ git init
Initialized empty Git repository in /Users/lewis/tmp/.git/

# 看到多了一个 .git 文件夹
➜ ls -al
total 0
drwxr-xr-x 3 lewis staff 96 3 4 09:41 .
drwxr-xr-x+ 128 lewis staff 4096 3 4 09:44 ..
drwxr-xr-x 9 lewis staff 288 3 4 09:43 .git

# 看看这个文件夹里有什么,嗯,有3个文件 和 4个文件夹
➜ ls -al .git
total 24
drwxr-xr-x 9 lewis staff 288 3 4 10:10 .
drwxr-xr-x 3 lewis staff 96 3 4 09:53 ..
-rw-r--r-- 1 lewis staff 23 3 4 09:53 HEAD
-rw-r--r-- 1 lewis staff 137 3 4 09:53 config
-rw-r--r-- 1 lewis staff 73 3 4 09:53 description
drwxr-xr-x 13 lewis staff 416 3 4 09:53 hooks
drwxr-xr-x 3 lewis staff 96 3 4 09:53 info
drwxr-xr-x 4 lewis staff 128 3 4 09:53 objects
drwxr-xr-x 4 lewis staff 128 3 4 09:53 refs

1.3 .git文件夹初探

这些都是干嘛用的呢?通过文件名,有一些好猜的,和一些不太好理解的

  • 好猜的,不妨先猜一下,

    • config:配置文件
    • description:描述文件,具体描述什么还不清楚,感觉不是核心
    • hooks:钩子文件夹,应该是做扩展功能用的,在主流程上加些钩子
    • info:存的是一些信息,什么信息要看一下
  • 不好猜的

    • HEAD:头?你个大头鬼啊。。。
    • objects:存的是对象?什么是对象?
    • refs:references的简写?存的是对象的引用?
  • 感觉好猜的部分,是辅助功能,不好猜的才是核心

1.3.1 辅助功能

1
2
3
4
5
6
7
8
9
10
11
12
13
14
15
16
17
18
19
20
21
22
23
24
25
26
27
28
29
30
31
32
33
34
35
36
37
38
39
40
41
42
43
44
45
46
47
48
# config里面存了什么?
➜ cat .git/config
[core]
repositoryformatversion = 0
filemode = true
bare = false
logallrefupdates = true
ignorecase = true
precomposeunicode = true
# 感觉就是些配置,能看懂一个 ignorecase,是忽略大小写,总之,这是配置文件

# description文件呢?
➜ cat .git/description
Unnamed repository; edit this file 'description' to name the repository.
# 看描述,是给仓库命名用的,先不管它

# 看看hooks文件夹
➜ ls -al .git/hooks
total 96
drwxr-xr-x 13 lewis staff 416 3 4 09:53 .
drwxr-xr-x 9 lewis staff 288 3 4 10:24 ..
-rwxr-xr-x 1 lewis staff 478 3 4 09:53 applypatch-msg.sample
-rwxr-xr-x 1 lewis staff 896 3 4 09:53 commit-msg.sample
-rwxr-xr-x 1 lewis staff 3327 3 4 09:53 fsmonitor-watchman.sample
-rwxr-xr-x 1 lewis staff 189 3 4 09:53 post-update.sample
-rwxr-xr-x 1 lewis staff 424 3 4 09:53 pre-applypatch.sample
-rwxr-xr-x 1 lewis staff 1638 3 4 09:53 pre-commit.sample
-rwxr-xr-x 1 lewis staff 1348 3 4 09:53 pre-push.sample
-rwxr-xr-x 1 lewis staff 4898 3 4 09:53 pre-rebase.sample
-rwxr-xr-x 1 lewis staff 544 3 4 09:53 pre-receive.sample
-rwxr-xr-x 1 lewis staff 1492 3 4 09:53 prepare-commit-msg.sample
-rwxr-xr-x 1 lewis staff 3610 3 4 09:53 update.sample
# 里面都是些示例文件,和猜测一样,是正常流程的钩子

# info文件夹下,只有一个文件
➜ tmp git:(master) ls -al .git/info
total 8
drwxr-xr-x 3 lewis staff 96 3 4 09:53 .
drwxr-xr-x 9 lewis staff 288 3 4 10:26 ..
-rw-r--r-- 1 lewis staff 240 3 4 09:53 exclude
# exclude文件里的内容,看不太懂,感觉是排除规则之类的
➜ cat .git/info/exclude
# git ls-files --others --exclude-from=.git/info/exclude
# Lines that start with '#' are comments.
# For a project mostly in C, the following would be a good set of
# exclude patterns (uncomment them if you want to use them):
# *.[oa]
# *~

1.3.2 核心功能

1
2
3
4
5
6
7
8
9
10
11
12
13
14
15
16
17
18
19
20
21
22
23
24
25
26
27
28
29
30
31
32
33
34
35
36
37
38
39
40
41
# HEAD 文件,这意思,是指向refs文件夹吗?
➜ cat .git/HEAD
ref: refs/heads/master

# 那就先看refs里面有什么吧!
➜ tmp git:(master) ls -alR .git/refs
total 0
drwxr-xr-x 4 lewis staff 128 3 4 09:53 .
drwxr-xr-x 9 lewis staff 288 3 4 10:34 ..
drwxr-xr-x 2 lewis staff 64 3 4 09:53 heads
drwxr-xr-x 2 lewis staff 64 3 4 09:53 tags

.git/refs/heads:
total 0
drwxr-xr-x 2 lewis staff 64 3 4 09:53 .
drwxr-xr-x 4 lewis staff 128 3 4 09:53 ..

.git/refs/tags:
total 0
drwxr-xr-x 2 lewis staff 64 3 4 09:53 .
drwxr-xr-x 4 lewis staff 128 3 4 09:53 ..
# refs里面有两个子文件夹,heads 和 tags,目前都是空的
# 有个heads,看来HEAD很可能是指向这个里面的

# objects里面,也是两个空文件夹
➜ tmp git:(master) ls -alR .git/objects
total 0
drwxr-xr-x 4 lewis staff 128 3 4 09:53 .
drwxr-xr-x 9 lewis staff 288 3 4 10:37 ..
drwxr-xr-x 2 lewis staff 64 3 4 09:53 info
drwxr-xr-x 2 lewis staff 64 3 4 09:53 pack

.git/objects/info:
total 0
drwxr-xr-x 2 lewis staff 64 3 4 09:53 .
drwxr-xr-x 4 lewis staff 128 3 4 09:53 ..

.git/objects/pack:
total 0
drwxr-xr-x 2 lewis staff 64 3 4 09:53 .
drwxr-xr-x 4 lewis staff 128 3 4 09:53 ..

2. 初识git

2.1 创建文件

1
2
3
4
5
# 创建一个空文件,取名为 hello.txt
➜ touch hello.txt
➜ ll
total 0
-rw-r--r-- 1 lewis staff 0B 3 4 10:46 hello.txt

2.2 交给git管理

1
2
3
4
5
6
7
8
9
10
11
12
13
14
15
16
17
18
19
20
# 加到git中
➜ git add hello.txt
# 此时,refs 和 objects无变化,但多出了一个index文件
➜ ls -al .git/
total 32
drwxr-xr-x 10 lewis staff 320 3 4 10:47 .
drwxr-xr-x 4 lewis staff 128 3 4 10:46 ..
-rw-r--r-- 1 lewis staff 23 3 4 09:53 HEAD
-rw-r--r-- 1 lewis staff 137 3 4 09:53 config
-rw-r--r-- 1 lewis staff 73 3 4 09:53 description
drwxr-xr-x 13 lewis staff 416 3 4 09:53 hooks
-rw-r--r-- 1 lewis staff 104 3 4 10:47 index
drwxr-xr-x 3 lewis staff 96 3 4 09:53 info
drwxr-xr-x 5 lewis staff 160 3 4 10:47 objects
drwxr-xr-x 4 lewis staff 128 3 4 09:53 refs
➜ cat .git/index
DIRC^_????^_????YI?????⛲??CK?)?wZ???S? hello.txt?kEO?
?Z.?!P?a?5e?8%
# index这个文件中有乱码,看来存的是二进制
# 能看到hello.txt,说明git add后,改动是存到这个文件的

结论一:

git add 指令,改动了「.git/index」这个文件。

2.3 提交为一个版本

1
2
3
4
5
# 提交
➜ git commit -m 'first file'
[master (root-commit) 528022a] first file
1 file changed, 0 insertions(+), 0 deletions(-)
create mode 100644 hello.txt

2.4 初步分析

1
2
3
4
5
6
7
8
9
10
11
12
13
14
15
16
17
18
19
20
21
22
23
24
25
26
27
28
29
30
31
32
33
34
35
36
37
38
39
40
41
42
43
44
45
46
47
48
49
50
51
52
53
54
55
56
57
58
59
60
61
# 看看index,感觉有改动,但看不出来具体做了什么
➜ tmp git:(master) cat .git/index
DIRC^_????^_????YI?????⛲??CK?)?wZ???S? hello.txtTREE1 0
:1???[B??B???%
# refs文件夹中,在heads里,多了一个master文件
➜ tmp git:(master) ls -alR .git/refs
total 0
drwxr-xr-x 4 lewis staff 128 3 4 09:53 .
drwxr-xr-x 12 lewis staff 384 3 4 11:06 ..
drwxr-xr-x 3 lewis staff 96 3 4 10:48 heads
drwxr-xr-x 2 lewis staff 64 3 4 09:53 tags

.git/refs/heads:
total 8
drwxr-xr-x 3 lewis staff 96 3 4 10:48 .
drwxr-xr-x 4 lewis staff 128 3 4 09:53 ..
-rw-r--r-- 1 lewis staff 41 3 4 10:48 master

.git/refs/tags:
total 0
drwxr-xr-x 2 lewis staff 64 3 4 09:53 .
drwxr-xr-x 4 lewis staff 128 3 4 09:53 ..

# objects文件夹中,多了3个文件夹,每个文件夹里都出现了一个文件
➜ tmp git:(master) ls -alR .git/objects
total 0
drwxr-xr-x 7 lewis staff 224 3 4 10:48 .
drwxr-xr-x 12 lewis staff 384 3 4 10:50 ..
drwxr-xr-x 3 lewis staff 96 3 4 10:48 52
drwxr-xr-x 3 lewis staff 96 3 4 10:47 e6
drwxr-xr-x 3 lewis staff 96 3 4 10:48 fc
drwxr-xr-x 2 lewis staff 64 3 4 09:53 info
drwxr-xr-x 2 lewis staff 64 3 4 09:53 pack

.git/objects/52:
total 8
drwxr-xr-x 3 lewis staff 96 3 4 10:48 .
drwxr-xr-x 7 lewis staff 224 3 4 10:48 ..
-r--r--r-- 1 lewis staff 127 3 4 10:48 8022a97b413fae3f4a8cc0e308e5506a598ea3

.git/objects/e6:
total 8
drwxr-xr-x 3 lewis staff 96 3 4 10:47 .
drwxr-xr-x 7 lewis staff 224 3 4 10:48 ..
-r--r--r-- 1 lewis staff 15 3 4 10:47 9de29bb2d1d6434b8b29ae775ad8c2e48c5391

.git/objects/fc:
total 8
drwxr-xr-x 3 lewis staff 96 3 4 10:48 .
drwxr-xr-x 7 lewis staff 224 3 4 10:48 ..
-r--r--r-- 1 lewis staff 54 3 4 10:48 b545d5746547a597811b7441ed8eba307be1ff

.git/objects/info:
total 0
drwxr-xr-x 2 lewis staff 64 3 4 09:53 .
drwxr-xr-x 7 lewis staff 224 3 4 10:48 ..

.git/objects/pack:
total 0
drwxr-xr-x 2 lewis staff 64 3 4 09:53 .
drwxr-xr-x 7 lewis staff 224 3 4 10:48 ..

结论二:

git commit时,对「.git/index」文件有改动;

git commit时,在「.git/objects」文件夹下,会增加文件;

2.5 引用分析

1
2
3
4
5
6
7
8
9
10
11
12
# 有没有发现,refs里面多出来的文件,正是HEAD文件所指向的?
➜ cat .git/HEAD
ref: refs/heads/master
➜ ls -al .git/refs/heads/master
-rw-r--r-- 1 lewis staff 41 3 4 10:48 .git/refs/heads/master

# 那这个master文件里面又存了什么?
➜ tmp git:(master) cat .git/refs/heads/master
528022a97b413fae3f4a8cc0e308e5506a598ea3
# 看着有点眼熟,确认一下
➜ tmp git:(master) ls -al .git/objects/52/8022a97b413fae3f4a8cc0e308e5506a598ea3
-r--r--r-- 1 lewis staff 127 3 4 10:48 .git/objects/52/8022a97b413fae3f4a8cc0e308e5506a598ea3

结论三:

「.git/HEAD」是一个指针文件,可以指向「.git/refs」中的文件;

「.git/refs/heads/master」文件也是一个指针,指向「.git/objects」里面的一个文件;

2.6 对象分析

1
2
3
4
5
6
7
# 用了个不熟悉的命令,它是查看这一串对象中存储内容的一个指令
➜ git cat-file -p 528022a97b413fae3f4a8cc0e308e5506a598ea3
tree fcb545d5746547a597811b7441ed8eba307be1ff
author Lewis <fangniude@gmail.com> 1583290125 +0800
committer Lewis <fangniude@gmail.com> 1583290125 +0800

first file
  • 可以看到,文件中有committerfirst file,说明这个对象存储的是commit的信息,就叫它commit对象
  • 还有一个tree,指向了另一个对象,那就叫它tree对象
1
2
3
# 看看 tree对象 中存了什么
➜ git cat-file -p fcb545d5746547a597811b7441ed8eba307be1ff
100644 blob e69de29bb2d1d6434b8b29ae775ad8c2e48c5391 hello.txt
  • tree对象 指向了第3个对象,感觉就是我们刚才新建的hello.txt文件
1
2
# 看看hello.txt 文件
➜ git cat-file -p e69de29bb2d1d6434b8b29ae775ad8c2e48c5391
  • 这个文件里面是空的,我们刚才的确没有写内容进去

结论四:

「.git/objects」里面,会存储commit对象、tree对象 和 blob对象;

commit对象,对应的是一个commit,会指向一个tree对象;

tree对象对应的是文件夹,还存储了其中文件的名字 和 这些文件的指针;

blob对象存储文件的内容

2.7 第1次提交图

1
2
3
4
5
6
7
graph LR

T1[/第1次提交tree/] -->|hello.txt| F1(空文件)
C1[第1次提交] -->T1

M((master)) -.-> C1
H((HEAD)) -.-> M

2.8 第2次提交

1
2
3
4
5
6
7
8
9
10
11
12
13
14
15
16
17
18
19
20
21
22
23
24
25
26
27
28
29
30
31
32
33
34
35
36
37
38
39
40
41
42
43
44
45
46
47
48
49
50
51
52
53
54
55
56
57
58
59
60
61
62
63
64
65
66
67
68
69
70
71
72
73
74
75
76
77
78
79
80
81
82
83
84
85
86
87
88
# 再建一个空的文件
➜ touch hello.copy
# 交给git管理
➜ git add hello.copy
# 提交
➜ git commit -m 'add hello.copy'
[master 9222323] add hello.copy
1 file changed, 0 insertions(+), 0 deletions(-)
create mode 100644 hello.copy

# 继续分析,master文件指向的对象变了
➜ cat .git/refs/heads/master
92223238a21c13bec2663fe349e8ea1dbfab97bb

# 这是新的commit对象,除了指向tree对象之外,还指向了一个parent
➜ git cat-file -p 92223238a21c13bec2663fe349e8ea1dbfab97bb
tree 598293c40ffff2b5d26ab7f9d78601e8d8d05d94
parent 528022a97b413fae3f4a8cc0e308e5506a598ea3
author Lewis <fangniude@gmail.com> 1583295073 +0800
committer Lewis <fangniude@gmail.com> 1583295073 +0800

add hello.copy

# parent对象就是上一次commit
➜ tmp git:(master) git cat-file -p 528022a97b413fae3f4a8cc0e308e5506a598ea3
tree fcb545d5746547a597811b7441ed8eba307be1ff
author Lewis <fangniude@gmail.com> 1583290125 +0800
committer Lewis <fangniude@gmail.com> 1583290125 +0800

first file

# tree对象里面,有了两个文件,两个文件指向了同一个blob对象
➜ tmp git:(master) git cat-file -p 598293c40ffff2b5d26ab7f9d78601e8d8d05d94
100644 blob e69de29bb2d1d6434b8b29ae775ad8c2e48c5391 hello.copy
100644 blob e69de29bb2d1d6434b8b29ae775ad8c2e48c5391 hello.txt

# 不妨看看此时的objects,变成5个对象,多了一个commit对象 和 一个tree对象
➜ tmp git:(master) ls -alR .git/objects
total 0
drwxr-xr-x 9 lewis staff 288 3 4 12:11 .
drwxr-xr-x 12 lewis staff 384 3 4 12:29 ..
drwxr-xr-x 3 lewis staff 96 3 4 10:48 52
drwxr-xr-x 3 lewis staff 96 3 4 12:11 59
drwxr-xr-x 3 lewis staff 96 3 4 12:11 92
drwxr-xr-x 3 lewis staff 96 3 4 10:47 e6
drwxr-xr-x 3 lewis staff 96 3 4 10:48 fc
drwxr-xr-x 2 lewis staff 64 3 4 09:53 info
drwxr-xr-x 2 lewis staff 64 3 4 09:53 pack

.git/objects/52:
total 8
drwxr-xr-x 3 lewis staff 96 3 4 10:48 .
drwxr-xr-x 9 lewis staff 288 3 4 12:11 ..
-r--r--r-- 1 lewis staff 127 3 4 10:48 8022a97b413fae3f4a8cc0e308e5506a598ea3

.git/objects/59:
total 8
drwxr-xr-x 3 lewis staff 96 3 4 12:11 .
drwxr-xr-x 9 lewis staff 288 3 4 12:11 ..
-r--r--r-- 1 lewis staff 63 3 4 12:11 8293c40ffff2b5d26ab7f9d78601e8d8d05d94

.git/objects/92:
total 8
drwxr-xr-x 3 lewis staff 96 3 4 12:11 .
drwxr-xr-x 9 lewis staff 288 3 4 12:11 ..
-r--r--r-- 1 lewis staff 160 3 4 12:11 223238a21c13bec2663fe349e8ea1dbfab97bb

.git/objects/e6:
total 8
drwxr-xr-x 3 lewis staff 96 3 4 10:47 .
drwxr-xr-x 9 lewis staff 288 3 4 12:11 ..
-r--r--r-- 1 lewis staff 15 3 4 12:11 9de29bb2d1d6434b8b29ae775ad8c2e48c5391

.git/objects/fc:
total 8
drwxr-xr-x 3 lewis staff 96 3 4 10:48 .
drwxr-xr-x 9 lewis staff 288 3 4 12:11 ..
-r--r--r-- 1 lewis staff 54 3 4 10:48 b545d5746547a597811b7441ed8eba307be1ff

.git/objects/info:
total 0
drwxr-xr-x 2 lewis staff 64 3 4 09:53 .
drwxr-xr-x 9 lewis staff 288 3 4 12:11 ..

.git/objects/pack:
total 0
drwxr-xr-x 2 lewis staff 64 3 4 09:53 .
drwxr-xr-x 9 lewis staff 288 3 4 12:11 ..

结论五:

增加一个commit后,master这个指针会指向新的commit;

commit对象可以指向其parent,即上一次提交;

同一个文件(内容相同的对象)只存储一份;

2.9 第2次提交图

1
2
3
4
5
6
7
8
9
10
11
12
graph LR
T1[/第1次提交tree/] -->|hello.txt| F1(空文件)
C1[第1次提交] -->T1

T2[/第2次提交tree/] -->|hello.txt| F1
T2 -->|hell.copy| F1
C2[第2次提交] -->T2

C2 -->C1

M((master)) -.-> C2
H((HEAD)) -.-> M

3. 分支branch

3.1 建dev分支

1
2
3
4
5
6
7
8
9
10
11
12
13
14
15
16
17
18
19
20
21
22
23
24
25
26
27
28
29
30
31
32
33
34
35
36
37
38
# 看看当前有哪些分支
➜ git branch
* master
(END)
# 看到只有一个master分支,前面有个`*`代表当前在这个分支

# 创建dev分支
➜ git branch dev
➜ git branch
dev
* master
(END)

# 切换到dev分支
➜ git checkout dev
Switched to branch 'dev'
➜ git branch
* dev
master
(END)

# 看看现在HEAD在哪儿?
➜ cat .git/HEAD
ref: refs/heads/dev

# 多出来一个dev文件,其中的内容 和 master完成一样
➜ cat .git/refs/heads/dev
92223238a21c13bec2663fe349e8ea1dbfab97bb
➜ cat .git/refs/heads/master
92223238a21c13bec2663fe349e8ea1dbfab97bb

# 看看 .git/refs/heads 文件夹下的内容
➜ ls -al .git/refs/heads
total 16
drwxr-xr-x 4 lewis staff 128 3 4 14:31 .
drwxr-xr-x 4 lewis staff 128 3 4 09:53 ..
-rw-r--r-- 1 lewis staff 41 3 4 14:31 dev
-rw-r--r-- 1 lewis staff 41 3 4 12:11 master
1
2
3
4
5
6
7
8
9
10
11
12
13
graph LR
T1[/第1次提交tree/] -->|hello.txt| F1(空文件)
C1[第1次提交] -->T1

T2[/第2次提交tree/] -->|hello.txt| F1
T2 -->|hell.copy| F1
C2[第2次提交] -->T2

C2 -->C1

M((master)) -.-> C2
D((dev)) -.-> C2
H((HEAD)) -.-> D

结论六:

分支是通过「refs/heads」下面的文件来管理,一个文件一个分支;

HEAD 指向哪儿,代表当前在哪个分支

3.2 dev分支提交

注意: 为了简化,我们在dev分支,先退回「第1次提交」,然后再做「第3次提交」

1
2
3
4
5
6
7
8
9
10
11
# 回到第1次提交
➜ git reset --hard 528022a97b413fae3f4a8cc0e308e5506a598ea3
HEAD is now at 528022a first file

# 验证一下,的确只有一个文件
➜ tmp git:(dev) ls -al
total 0
drwxr-xr-x 4 lewis staff 128 3 4 14:54 .
drwxr-xr-x+ 128 lewis staff 4096 3 4 14:55 ..
drwxr-xr-x 13 lewis staff 416 3 4 14:55 .git
-rw-r--r-- 1 lewis staff 0 3 4 10:46 hello.txt

然后,增加一个文件夹,并在其中增加个文件

1
2
3
4
5
6
7
8
9
10
11
12
13
14
15
16
17
18
19
20
21
22
23
24
25
26
27
28
29
30
31
32
33
34
35
36
37
38
39
40
41
42
43
44
45
46
47
48
49
50
51
52
53
# 新建 testBranch文件夹
➜ mkdir testBranch
# 添加个有内容的文件
➜ echo 'this is dev file' > testBranch/devAdd.txt
# 确认下,文件添加成功了,其中有内容
➜ cat testBranch/devAdd.txt
this is dev file

# 加到index中
➜ git add testBranch/devAdd.txt

# 第3次提交
➜ git commit -m 'third commit'
[dev 1616454] third commit
1 file changed, 1 insertion(+)
create mode 100644 testBranch/devAdd.txt

# 当前是怎么样的呢?
# 先看HEAD,还是指向dev
➜ tmp git:(dev) cat .git/HEAD
ref: refs/heads/dev

# dev指向了第3次提交
➜ tmp git:(dev) cat .git/refs/heads/dev
161645439e35c5db8f4755641ca98815c69a9d63
➜ tmp git:(dev) git cat-file -p 161645439e35c5db8f4755641ca98815c69a9d63
tree fb54f679949f2593bb83d4179f8c7d058393235c
parent 528022a97b413fae3f4a8cc0e308e5506a598ea3
author Lewis <fangniude@gmail.com> 1583306810 +0800
committer Lewis <fangniude@gmail.com> 1583306810 +0800

third commit

# 第3次提交的parent,是第1次提交,没毛病
➜ tmp git:(dev) git cat-file -p 528022a97b413fae3f4a8cc0e308e5506a598ea3
tree fcb545d5746547a597811b7441ed8eba307be1ff
author Lewis <fangniude@gmail.com> 1583290125 +0800
committer Lewis <fangniude@gmail.com> 1583290125 +0800

first file

# 第3次提交的tree对象中,除了第1次提交的hello.txt外,还有一个tree对象,指向testBranch
➜ tmp git:(dev) git cat-file -p fb54f679949f2593bb83d4179f8c7d058393235c
100644 blob e69de29bb2d1d6434b8b29ae775ad8c2e48c5391 hello.txt
040000 tree ba015591b2652a669fc5892ff58023af8482e8c3 testBranch

# testBranch这个对象,包含1个blob对象,即devAdd.txt这个文件
➜ tmp git:(dev) git cat-file -p ba015591b2652a669fc5892ff58023af8482e8c3
100644 blob 101ff992f2995edf65ee71ebee38b7ba412555cf devAdd.txt

# 这个文件中的内容,是刚才输入的文字
➜ tmp git:(dev) git cat-file -p 101ff992f2995edf65ee71ebee38b7ba412555cf
this is dev file

看看现在的图:

1
2
3
4
5
6
7
8
9
10
11
12
13
14
15
16
17
graph LR
T1[/第1次提交tree/] -->|hello.txt| F1(空文件)
C1[第1次提交] -->T1

T2[/第2次提交tree/] -->|hello.txt| F1
T2 -->|hell.copy| F1
C2[第2次提交] -->T2
C2 -->C1

T3[/testBranch的tree/] -->F2(devAdd.txt)
T4[/第3次提交tree/] -->|hello.txt| F1
T4 --> T3
C3[第3次提交] --> T4

M((master)) -.-> C2
D((dev)) -.-> C3
H((HEAD)) -.-> D

结论七:

分支就是个引用(或 指针),可以随便指向哪个对象;

在引用改变的时候,对象不用动;

每一次提交,都会生成一个新的「提交tree」;

文件夹是通过「tree对象」管理版本的,tree对象可以指向tree对象 和 blob对象

3.3 分支合并

将dev分支的,合并到master分支。

3.3.1 merge合并

1
2
3
4
5
6
7
8
9
10
11
12
13
14
15
16
17
18
19
20
21
22
23
24
25
26
27
28
29
30
31
32
33
34
35
36
37
38
39
40
41
42
43
44
45
46
47
48
49
# 切回master分支
➜ git checkout master
Switched to branch 'master'

# 从dev分支merge过来
➜ git merge dev
Merge made by the 'recursive' strategy.
testBranch/devAdd.txt | 1 +
1 file changed, 1 insertion(+)
create mode 100644 testBranch/devAdd.txt

# 来看现在是怎么样的,还是从HEAD开始
➜ cat .git/HEAD
ref: refs/heads/master
# 看看master里面,指向了一个新的merge commit,它有2个parent
➜ cat .git/refs/heads/master
bb6c11e29dcc8865f9c8eae2da89750fd29bf005
➜ git cat-file -p bb6c11e29dcc8865f9c8eae2da89750fd29bf005
tree 202b85d575214f94ed494ee026e8b2cdb4fcab4f
parent 92223238a21c13bec2663fe349e8ea1dbfab97bb
parent 161645439e35c5db8f4755641ca98815c69a9d63
author Lewis <fangniude@gmail.com> 1583313790 +0800
committer Lewis <fangniude@gmail.com> 1583313790 +0800

Merge branch 'dev'

# 第1个parent是 第2次提交
➜ git cat-file -p 92223238a21c13bec2663fe349e8ea1dbfab97bb
tree 598293c40ffff2b5d26ab7f9d78601e8d8d05d94
parent 528022a97b413fae3f4a8cc0e308e5506a598ea3
author Lewis <fangniude@gmail.com> 1583295073 +0800
committer Lewis <fangniude@gmail.com> 1583295073 +0800

add hello.copy

# 第2个parent是 第3次提交
➜ git cat-file -p 161645439e35c5db8f4755641ca98815c69a9d63
tree fb54f679949f2593bb83d4179f8c7d058393235c
parent 528022a97b413fae3f4a8cc0e308e5506a598ea3
author Lewis <fangniude@gmail.com> 1583306810 +0800
committer Lewis <fangniude@gmail.com> 1583306810 +0800

third commit

# 当然,它还指向了第4次提交的树,其中有原来master 和 dev所有的文件
➜ git cat-file -p 202b85d575214f94ed494ee026e8b2cdb4fcab4f
100644 blob e69de29bb2d1d6434b8b29ae775ad8c2e48c5391 hello.copy
100644 blob e69de29bb2d1d6434b8b29ae775ad8c2e48c5391 hello.txt
040000 tree ba015591b2652a669fc5892ff58023af8482e8c3 testBranch

现在的图,是这样的:

1
2
3
4
5
6
7
8
9
10
11
12
13
14
15
16
17
18
19
20
21
22
23
24
graph LR
T1[/第1次提交tree/] -->|hello.txt| F1(空文件)
C1[第1次提交] -->T1

T2[/第2次提交tree/] -->|hello.txt| F1
T2 -->|hell.copy| F1
C2[第2次提交] -->T2
C2 -->C1

T3[/testBranch的tree/] -->F2(devAdd.txt)
T4[/第3次提交tree/] -->|hello.txt| F1
T4 --> T3
C3[第3次提交] --> T4

T5[/第4次提交tree/] -->|hello.txt|F1
T5 -->|hello.copy|F1
T5 -->T3
C4[第4次提交]-->T5
C4 --> C2
C4 --> C3

M((master)) -.-> C4
D((dev)) -.-> C3
H((HEAD)) -.-> M

3.3.2 rebase合并

思路:dev基于master合并,开发中最常用的工作模式。

1
2
3
4
5
6
7
8
9
10
11
12
13
14
15
16
17
18
19
20
21
22
23
24
25
26
27
28
29
30
31
32
33
34
35
36
37
38
39
40
# 需要先回滚刚才的操作
➜ git reset --hard 92223238a21c13bec2663fe349e8ea1dbfab97bb
HEAD is now at 9222323 add hello.copy

# 切换到dev分支
➜ git checkout dev
Switched to branch 'dev'

# 执行rebase
➜ git rebase master
First, rewinding head to replay your work on top of it...
Applying: third commit

# 然后,一起来看效果吧,dev有了一个新的commit
➜ cat .git/refs/heads/dev
6b4df1e31ed4c652f790841f46f30c34abb65c8c
➜ tmp git:(dev) git cat-file -p 6b4df1e31ed4c652f790841f46f30c34abb65c8c
tree 202b85d575214f94ed494ee026e8b2cdb4fcab4f
parent 92223238a21c13bec2663fe349e8ea1dbfab97bb
author Lewis <fangniude@gmail.com> 1583306810 +0800
committer Lewis <fangniude@gmail.com> 1583315190 +0800

third commit

# 这个commit的parent,是master指向的那次提交,即第2次提交
➜ tmp git:(dev) cat .git/refs/heads/master
92223238a21c13bec2663fe349e8ea1dbfab97bb
➜ tmp git:(dev) git cat-file -p 92223238a21c13bec2663fe349e8ea1dbfab97bb
tree 598293c40ffff2b5d26ab7f9d78601e8d8d05d94
parent 528022a97b413fae3f4a8cc0e308e5506a598ea3
author Lewis <fangniude@gmail.com> 1583295073 +0800
committer Lewis <fangniude@gmail.com> 1583295073 +0800

add hello.copy

# 当然,它指向的树对象,居然是刚才merge时,第4次提交的树对象,因为内容一致,直接重用了
➜ git cat-file -p 202b85d575214f94ed494ee026e8b2cdb4fcab4f
100644 blob e69de29bb2d1d6434b8b29ae775ad8c2e48c5391 hello.copy
100644 blob e69de29bb2d1d6434b8b29ae775ad8c2e48c5391 hello.txt
040000 tree ba015591b2652a669fc5892ff58023af8482e8c3 testBranch

下面是现在的图:

1
2
3
4
5
6
7
8
9
10
11
12
13
14
15
16
17
18
19
graph LR
T1[/第1次提交tree/] -->|hello.txt| F1(空文件)
C1[第1次提交] -->T1

T2[/第2次提交tree/] -->|hello.txt| F1
T2 -->|hell.copy| F1
C2[第2次提交] -->T2
C2 -->C1

T3[/testBranch的tree/] -->F2(devAdd.txt)
T5[/第5次提交tree/] -->|hello.txt| F1
T5[/第5次提交tree/] -->|hello.copy| F1
T5 --> T3
C5[第5次提交] --> T5
C5 --> C2

M((master)) -.-> C2
D((dev)) -.-> C5
H((HEAD)) -.-> D

4. 标签tag

我们给第2次提交,打个2.0标签,第5次提交打个3.0标签。

1
2
3
4
5
6
7
8
9
10
11
12
13
14
15
16
17
18
19
20
21
22
# 当前在dev分支,即5次提交
➜ git tag -a 3.0 -m 'this is 3.0'

# 切换到master分支,即第2次提交
➜ git checkout master
Switched to branch 'master'
# 这个偷个懒,不带什么参数
➜ git tag 2.0

# 可以看到,两个tag打好了
➜ git tag --list
2.0
3.0
(END)

# 再看看refs/tags吧
➜ ls -al .git/refs/tags
total 16
drwxr-xr-x 4 lewis staff 128 3 4 18:17 .
drwxr-xr-x 4 lewis staff 128 3 4 09:53 ..
-rw-r--r-- 1 lewis staff 41 3 4 18:16 2.0
-rw-r--r-- 1 lewis staff 41 3 4 18:17 3.0

4.1 轻量的tag

我们先来看2.0这个tag。

1
2
3
4
5
6
7
8
9
10
11
12
# 和分支一样,2.0这个tag里面,也是存了一个引用
➜ cat .git/refs/tags/2.0
92223238a21c13bec2663fe349e8ea1dbfab97bb

# 指向的是第2次提交,就像现在的master一样
➜ git cat-file -p 92223238a21c13bec2663fe349e8ea1dbfab97bb
tree 598293c40ffff2b5d26ab7f9d78601e8d8d05d94
parent 528022a97b413fae3f4a8cc0e308e5506a598ea3
author Lewis <fangniude@gmail.com> 1583295073 +0800
committer Lewis <fangniude@gmail.com> 1583295073 +0800

add hello.copy

4.2 重量的tag

1
2
3
4
5
6
7
8
9
10
11
12
13
14
15
16
17
18
19
20
21
# 这个也类似
➜ cat .git/refs/tags/3.0
87c71f8bfbbb86ffae62f61f322084654932f85a

# 但它指向了一个没有见过的对象,能看到刚才输入的信息,它指向了另一个object
➜ git cat-file -p 87c71f8bfbbb86ffae62f61f322084654932f85a
object 6b4df1e31ed4c652f790841f46f30c34abb65c8c
type commit
tag 3.0
tagger Lewis <fangniude@gmail.com> 1583317040 +0800

this is 3.0

# 指向了谁呢?当然是第5次提交了
➜ git cat-file -p 6b4df1e31ed4c652f790841f46f30c34abb65c8c
tree 202b85d575214f94ed494ee026e8b2cdb4fcab4f
parent 92223238a21c13bec2663fe349e8ea1dbfab97bb
author Lewis <fangniude@gmail.com> 1583306810 +0800
committer Lewis <fangniude@gmail.com> 1583315190 +0800

third commit

4.3 有tag的图

1
2
3
4
5
6
7
8
9
10
11
12
13
14
15
16
17
18
19
20
21
22
23
24
25
26
27
28
29
graph LR

%% 第1次提交
T1[/第1次提交tree/] -->|hello.txt| F1(空文件)
C1[第1次提交] -->T1

%% 第2次提交
T2[/第2次提交tree/] -->|hello.txt| F1
T2 -->|hell.copy| F1
C2[第2次提交] -->T2
C2 -->C1

%% 第5次提交
T3[/testBranch的tree/] -->F2(devAdd.txt)
T5[/第5次提交tree/] -->|hello.txt| F1
T5[/第5次提交tree/] -->|hello.copy| F1
T5 --> T3
C5[第5次提交] --> T5
C5 --> C2

%% 分支
M((master)) -.-> C2
D((dev)) -.-> C5
H((HEAD)) -.-> M

%% tag
2((2.0)) -.->C2
TAG>Tag对象]-->C5
3((3.0)) -.->TAG

5. 时光机

6. 远程remote

7. 总结

1. 发债前

  • 背景
    • 嗯,这个项目挺好,值得尝试
    • 一看账户,好像没钱呀
  • 怎么搞到钱呢?
    • 已经上市了,扩股什么的不太好弄
    • 发企业债,利息有点高,风险也大,搞杂了,还要自己还钱,连本带利
    • 嗯,如果能发个低利息的债券,就好了(本质是债券)
  • 可是,低利息债券没人要,怎么办?
    • 为了吸引投资者,说这个呢,过几年可以「以现在的股价」转股 (固定的转股价)
    • 股价是长期上涨的呀,买到就是赚到
  • 投资者要是问:股价要是跌了呢?
    • 股价跌了,我们开会讨论一下,多数股东同意了,给你「下调转股价」(下修条款)
  • 投资者再问:如果你的股东都不同意呢?
    • 其实呢,我们是想让你成为股东的,这群股东也是这么想的,他们怕你来要钱,一般会同意的
  • 老股东会问:股价要是涨的很高很高了,这邦孙子再用这么低的价格转股,不是太便宜他们了吗?
    • 我加个「强赎条款」,现在的100块钱,涨到130,就逼他们卖,不识相的,就只给103块打发走
  • 可是,过个几年,要是没钱还,怎么办?
    • 嗯,我这是「刘备借荆州」,就没想着还,我一定会逼他们转股的 (转股是双方共同的心愿)
  • 还有,最坏的情况是什么?
    • 大多数人转股了,少部分人不转,还是要给钱
    • 这不行,我要加个说明,少于多人,也要「强赎」(第2个强赎条件)

2. 发债中

  • 证监会看了一下,想:这帮韭菜,什么都不懂,既然投靠我,我得罩着他们点
  • 第一,你这个要专款专用,不用拿来干别的,想干别的,得来申请,允许人家把钱拿走
    • 老板满口说:行,行,不用来干别的(变更资金用途,触发回售)
  • 第二,债券上市前6个月,不能转股,别想给我操纵股价,欺负弱小
    • 老板想了想,说行,你是老大,全听你的 (半年后,才进入转股期)
  • 第三,6年,生个孩子都能打酱油了,你的股价还是不涨,拖到最后,只给一点利息,这不合适!
    • 老板想了想,委屈的说:好吧,我加一条,最后两年,来讨债的,我无条件还钱 (回售期)

3. 发债前几年

  • 股价涨了
    • 要快点拉这邦孙子下水,债主变股东
    • 是自己人,心里就舒坦多了
    • 还有,钱想怎么花,就怎么花,别人(证监会)管不着了
  • 股价跌了
    • 刚开始:还不急,我不下调「转股价」,他们也没办法
    • 过了两年还是没有起色:得调一下了,反正现在股份也不值钱,会有一部分人换股份,套现走人的
    • 又过了1年:不好了,他们很快就能来讨债了,得快点拉他们下水,「转股价」调低一点

4. 回售期

  • 他们要来讨债了,还是准备点钱吧,也不用太多!
  • 想尽一切办法,用尽所有手段,务必在短时间内,化敌为友

一般说的二层,指的是「数据链路层」,即Data Link Layer。

1. 二层的定义

通俗的说,数据链路层是用来对接不同的物理设备(MAC),向上提供统一的接口(LLC)的一层,因为它解决了兼容不同物理设备的问题,所以,研究网络分层往往把它当作第一层,就像汇编语言作为最低层的编程语言一样。

以下是比较专业的说法:


数据链路层(Data Link Layer)是OSI参考模型第二层,位于物理层网络层之间。在广播式多路访问链路中(局域网),由于可能存在介质争用,它还可以细分成介质访问控制(MAC)子层和逻辑链路控制(LLC)子层,介质访问控制(MAC)子层专职处理介质访问的争用与冲突问题。

局域网广域网皆属第一、二层。

image-20191209151808865

image-20191209151808865

媒体接入控制(英语:Media Access Control,缩写:MAC)子层,是局域网数据链路层的下层部分,提供定址及媒体访问的控制方式,使得不同设备或网络上的节点可以在多点的网络上通信,而不会互相冲突,上述的特性在局域网或者城域网中格外重要。早期网络发展时以MAC判别个网络接口之位置,但后来互联网发展后,才有IP之制定与使用[来源请求]。若只是两台设备之间全双工的通信,因为两台设备可以同时发送及接收数据,不会冲突,因此不需要用到MAC协议。

MAC子层作为逻辑链路控制子层及物理层之间沟通的介质,提供了一种定址的方法,称为实体地址或MAC地址。MAC地址是唯一的,每张网卡的MAC地址都不一样,因此可以在一子网中发送数据包到特定的目的设备。此处的子网是指没有路由器的实体网络(例如以太网)。

逻辑链路控制(英语:Logical Link Control,简称LLC)是局域网数据链路层的上层部分,IEEE 802.2中定义了逻辑链路控制协议。用户的数据链路服务透过LLC子层为网络层提供统一的接口。在LLC子层下面是MAC(介质访问控制)子层。

IEEE标准中增加了这个子层,该子层透过在IP包上加了8位元的目的地址服务接入点和源地址服务接入点来保证在不同网络类型中传输。另外,有一个8或16位的控制字段用于象流控制的辅助功能。

2. 协议栈

2.1 以太网二层协议

在以太网协议(IEEE802.3)中,有如下一张图
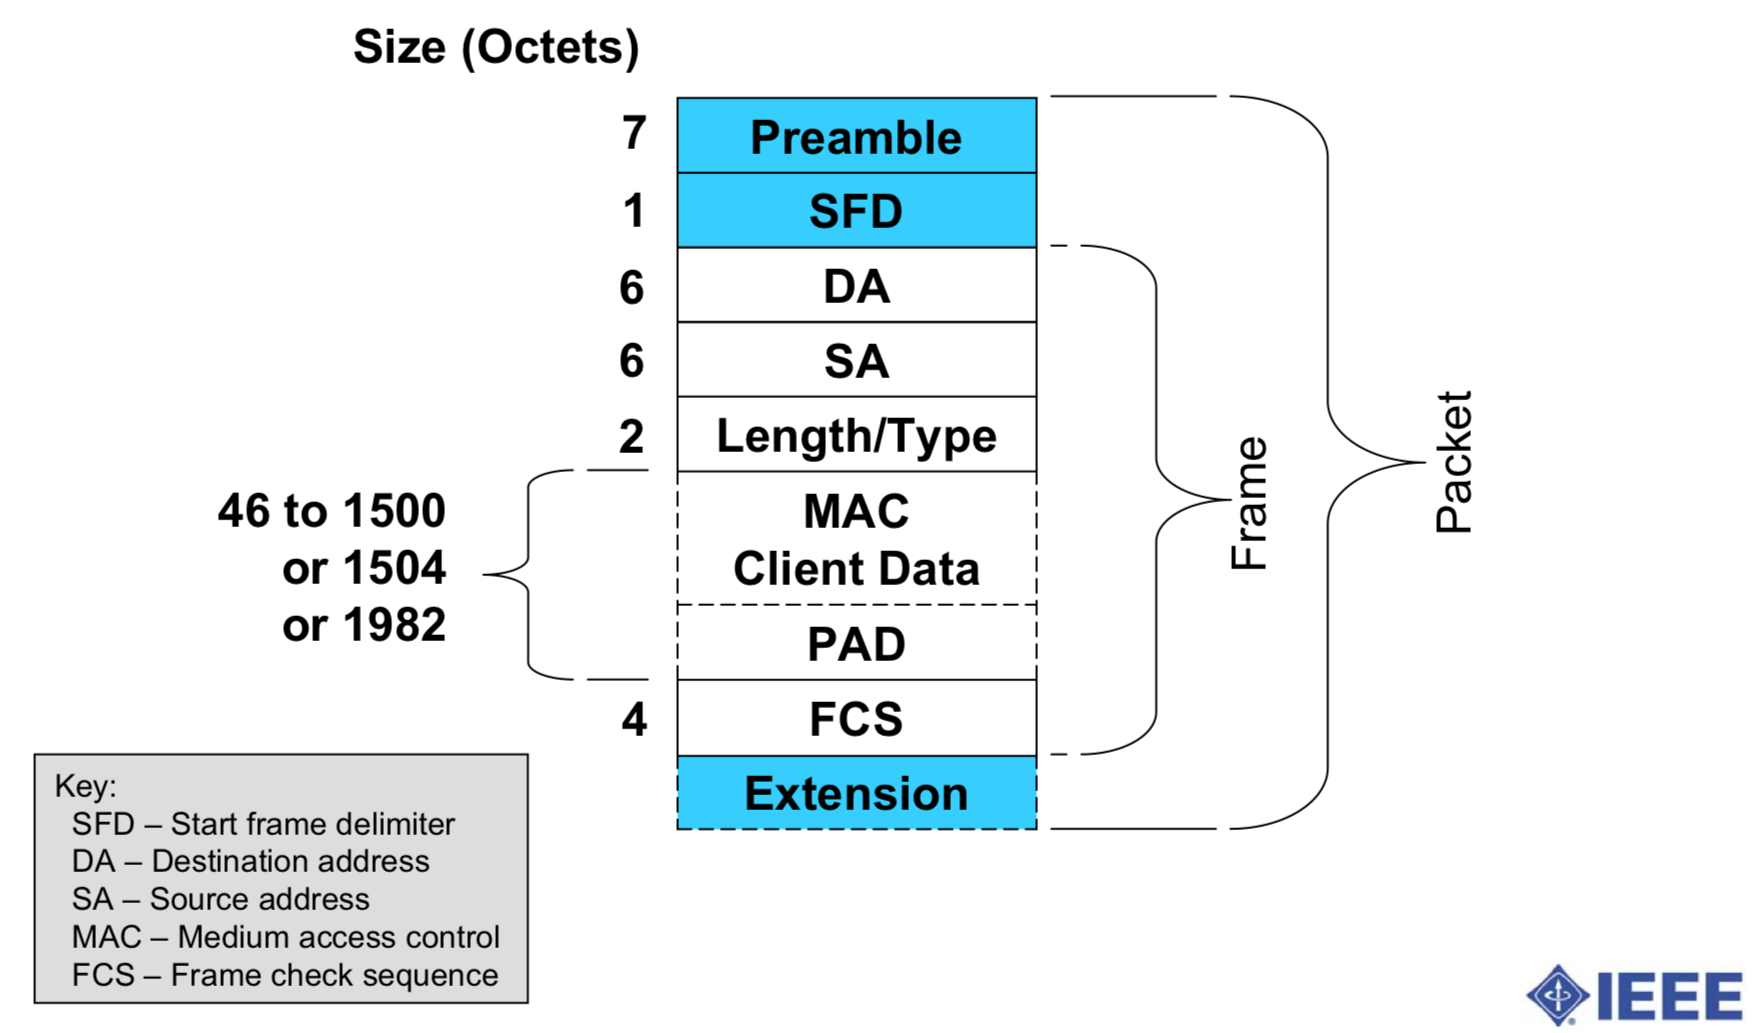
image-20191206174252904

从图中可以看出:

  • Frame的确如前面据说,分为这几个部分
  • 在Frame的外层,是Packet
  • Packet可以理解成MAC,Frame是LLC
  • Packet分为前8个字节,Frame,和扩展的内容
  • 前8个字节,定义了包的开始,分为前7个字节Preamble,翻译为「前导码」和第8个字节SFD开始帧分隔符
  • 前7个字节的内容均为10101010B,第8个字节的内容为10101011B(图中看不出来)
  • Frame中,对三层协议协议中的内容也做了定义,至少46个字节,如果不够,就用PAD来补齐

那如何知道帧何时结束呢?

这应该是和物理层密切相关的 「媒体访问控制层」 要解决的问题。

2.2 抓包看看

Wireshark协议栈如下图:

image-20191206160800871

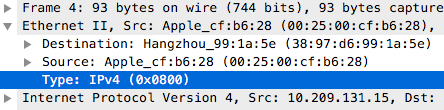
Wireshark中一般无法显示CRC校验的这4个字节。

3. 几个问题

3.1. 物理层有没有协议栈?

物理层和数据链路层很难分开说,如最常用的以太网协议(IEEE802.3),无线局域网协议WI-FI(IEEE802.11),都是定义物理层和数据链路层的。

物理层是有协议栈的,但是,它的协议栈并不通用,每种物理层对应的协议栈不一样,需要单独研究。

因为从二层的LLC及以上,协议栈通用的,按照这样来理解,物理层没有协议栈。

3.2. 在网络信号中,一个完整的Frame如何定义?

从官方图中能够看出,实际传输的包是Packet,包括MAC和LLC,Frame是LLC传输的内容。

于是,Frame内容的完整性,是由Packet来决定的,Packet依赖物理层,不同物理层可以有不同的实现。

所以,不好统一的说Frame是由什么分隔。

3.3. 二层设备如何处理二层协议栈?

二层主要内容是DestinationAddress,即下一个网络设备是谁,如果DestinationAddress是自己,那就是需要解三层,如果不是自己,那就不需要解三层。对交换机而言,不是自己,但是是自己知道的一个网口,那就把这个包发到对应的网口。

3.4. 二层设备在解决什么问题?

在解决相邻设备 或 同一个局域网通信的问题。

3.5. 工作在二层上的协议有哪些?

3.5.1 ARP(LLC)

地址解析协议(英语:Address Resolution Protocol,缩写:ARP)是一个通过解析网络层地址来找寻数据链路层地址的网络传输协议,它在IPv4中极其重要。ARP最初在1982年的RFC 826(征求意见稿)[1]中提出并纳入互联网标准 STD 37. ARP 也可能指是在多数操作系统中管理其相关地址的一个进程。

ARP的目的,是通过IP地址,找到它的MAC地址,虽然工作在二层,只在局域网中起作用,但是,事实上,它是有三层协议的内容的,像IP地址,就是三层协议头中的内容。

3.5.2 Ethernet(MAC)

以太网(英语:Ethernet)是一种计算机局域网技术。IEEE组织的IEEE 802.3标准制定了以太网的技术标准,它规定了包括物理层的连线、电子信号和介质访问层协议的内容。以太网是当前应用最普遍的局域网技术,取代了其他局域网标准如令牌环FDDIARCNET

以太网的标准拓扑结构为总线型拓扑,但当前的快速以太网(100BASE-T1000BASE-T标准)为了减少冲突,将能提高的网络速度和使用效率最大化,使用交换机(Switch hub)来进行网络连接和组织。如此一来,以太网的拓扑结构就成了星型;但在逻辑上,以太网仍然使用总线型拓扑和CSMA/CD(Carrier Sense Multiple Access/Collision Detection,即载波多重访问/碰撞侦测)的总线技术。

3.5.3 Wi-Fi(MAC)

Wi-Fi(发音: /ˈwaɪfaɪ/[1][2][3]),在中文里又称作“无线热点”,是Wi-Fi联盟制造商的商标做为产品的品牌认证,是一个创建于IEEE 802.11标准的无线局域网技术。基于两套系统的密切相关,也常有人把Wi-Fi当做IEEE 802.11标准的同义术语。“Wi-Fi”常被写成“WiFi”或“Wifi”,但是它们并没有被Wi-Fi联盟认可。

3.5.4 NDP(LLC)

邻居发现协议(英语:Neighbor Discovery Protocol简称:NDPND)是TCP/IP协议栈的一部分,主要与IPv6共同使用。它工作在数据链路层,负责在链路上发现其他节点和相应的地址,并确定可用路由和维护关于可用路径和其他活动节点的信息可达性。(RFC 4861, 2007)

因为历史原因,项目中的一些文件,是GBK编码的,需要统一转成UTF-8。

可以使用以下命令:

1
find ./ -name "*.properties" -exec enca -x UTF-8 {} \;

该命令中,用到了2个命令:find 和 enca。

find为系统自带,enca是我手工安装的。

1
brew install enca

先找到所有的 properties文件,然后用enca将文件转码。

enca有个好处:如果原来的编码就是目标编码,则不会转。

7z

1
2
3
4
5
6
7
8
# 安装 p7zip
yum install p7zip

# 压缩
7za a dump.7z dump.sql

# 解压缩
7za x dump.7z

mysql备份

1
2
3
4
5
6
7
8
9
10
# 为了不输入密码
vim ~/.my.cnf
# 输入以下内容
[mysqldump]
user=root
password=the-password

# mysqldump 同时7z压缩

mysqldump databaseName | 7za a -si databaseName_2020_01_01.7z

rsync 限速拷贝

1
rsync -e "ssh -p 23854" --progress --bwlimit=450 root@192.168.100.200:/path/to/file.7z /path/to/file.7z

该有的权限,却提示没有时

1
2
3
4
5
6
# 查看权限
[root@linux ~]# lsattr YourFile
  ---i---------- YourFile
[root@linux ~]# chattr -i YourFile
[root@linux ~]# lsattr YourFile
  -------------- YourFile

ps命令用不了(因为中过毒)

1
2
3
4
5
# rpm 删掉这个软件
rpm -e --nodeps procps

# yum重新装一下
yum install procps

本文写给git初学者,如果你用git有些时候了,仍然经常遇到问题,本文或许也会有点用处。

本文先大致讲一下git的原理,先明白那些命令操作的「对象」是什么,然后介绍了常用的一些命令,在什么情况下用哪个。

1. 基本理论

  • 在git一堆指令的背后,有2个东西:reference 和 object;
  • reference更为人知的名字有:branch,tag,HEAD
  • 一个object存储一个文件、文件夹、commit 或 tag的内容;
  • object以KeyValue存储,Key是object的SHA1,Value是object本身;
  • object中可以存储其他object的Key;
  • reference存储object的Key,指向object,就是个指针;
  • 所有的reference + object组成一个DAG(有向无环图);
  • 对git的每一次操作,都是在这张图上搞事情;
  • 对git的每一个操作,都要知道这张图将会变成怎样。

1.1 object对象

我知道的object有这么4类:blob、tree、commit和tag。

1.1.1 blob

blob类型的object存储着「文件」的内容,不包括文件名、权限等信息,只是内容。

因为git是根据内容生成Key,Key又是惟一的,所以git中重复文件只占用一份的空间。

1.1.2 tree

tree存储的是「文件夹」的信息,包括文件夹中的 子文件夹、文件 和 他们的访问权限,但不包括自己的。

1.1.3 commit

commit是一次「提交」,指向一个tree对象,并存下来是谁在什么时候提交的,提交的时候说了什么话。

1.1.4 tag

tag对象存储着tag信息,一般指向一个commit对象,并存下来tag名,打tag的人等信息。

1.2 reference引用

引用就是指针,存着某个对象的Key。常用的引用有3类(branch, remote branch, tag) 和 一个特殊的引用HEAD。

1.2.1 branch

分支只是一个引用,创建分支就是创建了一个引用,指向了一个commit,所以,在git中会见到多个branch都同时在一个commit上,branch还可以随意跳来跳去,一会儿在这个commit,一会儿到那个commit,非常自由,因为人家本来就是个「指针」。

1.2.2 remote branch

远程分支,是由远程负责的。

1.2.3 tag

建了之后不能改的引用。

看到这里,可能会觉得有点怪,怎么tag又是对象,又是引用?

的确,有tag引用,也有tag对象,他们是两个东西。

tag引用可以指向tag对象,也可以指向commit,甚至可以指向tree 或 blob。

1.2.4 HEAD

HEAD是一个特殊的引用,它是指向引用的引用,存的不是对象的Key,而是引用的path。

HEAD指向当前 工作空间 中的内容,是指向哪儿的。

1.3 总结

一图胜千言,下面图说明了这几种对象 和 引用 的关系。

006y8mN6ly1g8gd3ey111j30c30fitaw

  • git是管理一个文件夹中所有的文件 及 历史的一套系统;
  • 通过版本来管理历史,一个版本是一个commit;
  • 一个文件的一个版本是一个blob对象;
  • 一个文件夹的一个版本是一个tree对象;
  • 一个commit对象会指向一个tree对象;
  • 一个commit一般会指向一个commit对象,即它的上一个版本;
  • 一个commit对象可能指向0个commit(第1个版本);
  • 一个commit对象也可能指向多个commit(由2个版本合并出一个新的版本);
  • 有「引用」才被载入史册,否则会被大浪淘沙,移为平地(gc);
  • 分支指向最新的commit,代表当代;
  • 历史上总有一些关键点,需要特别标识出来,那就给他们取个名字打上tag,以后根据tag名字来找他们就方便多了;
  • git有一个时光机,可以在过去、现在 甚至 未来中自由穿梭,那我当前文件夹中看到的,究竟是哪个年代的呢?看看HEAD在哪儿就知道了;

2. 验证理论

2.1 文件夹结构

在.git文件夹下,我们能看到HEAD,index两个文件, 和 objects,refs两个文件夹,这是本文探寻的主要内容。

1
2
3
4
5
6
7
8
9
10
11
12
13
14
15
16
17
18
➜  .git git:(master) ll
total 104
-rw-r--r-- 1 lewis staff 69B 10 24 13:49 COMMIT_EDITMSG
-rw-r--r-- 1 lewis staff 669B 10 30 16:57 FETCH_HEAD
-rw-r--r-- 1 lewis staff 23B 10 30 17:51 HEAD
-rw-r--r-- 1 lewis staff 41B 10 24 13:48 ORIG_HEAD
-rw-r--r-- 1 lewis staff 525B 10 24 11:38 config
-rw-r--r-- 1 lewis staff 73B 10 16 21:00 description
-rw-r--r-- 1 lewis staff 155B 10 24 13:49 fork-settings
drwxr-xr-x 14 lewis staff 476B 10 16 21:03 hooks
-rw-r--r-- 1 lewis staff 4.6K 10 30 17:51 index
drwxr-xr-x 3 lewis staff 102B 10 25 14:20 info
-rw-r--r-- 1 lewis staff 5.2K 10 24 10:15 jgitflow.log
drwxr-xr-x 4 lewis staff 136B 10 16 21:00 logs
drwxr-xr-x 118 lewis staff 3.9K 10 24 13:49 objects
-rw-r--r-- 1 lewis staff 114B 10 16 21:00 packed-refs
drwxr-xr-x 5 lewis staff 170B 10 16 21:00 refs
-rw-r--r--@ 1 lewis staff 174B 10 25 15:06 sourcetreeconfig

2.2 引用

2.2.1 HEAD

HEAD下面存的是一个路径,指向了refs文件夹下的一个文件:refs/heads/master

1
2
➜  .git git:(master) cat HEAD 
ref: refs/heads/master

2.2.2 refs

我们看refs下面有哪些东西:

1
2
3
4
5
6
7
8
9
10
11
12
13
14
15
16
17
18
19
20
21
22
23
24
25
26
27
28
29
30
31
32
33
34
35
➜  .git git:(master) ls -alR refs
total 0
drwxr-xr-x 5 lewis staff 170 10 16 21:00 .
drwxr-xr-x 18 lewis staff 612 10 30 17:51 ..
drwxr-xr-x 4 lewis staff 136 10 24 13:49 heads
drwxr-xr-x 3 lewis staff 102 10 16 21:00 remotes
drwxr-xr-x 4 lewis staff 136 10 25 14:34 tags

refs/heads:
total 16
drwxr-xr-x 4 lewis staff 136 10 24 13:49 .
drwxr-xr-x 5 lewis staff 170 10 16 21:00 ..
-rw-r--r-- 1 lewis staff 41 10 24 13:49 master
-rw-r--r-- 1 lewis staff 41 10 24 13:42 release

refs/remotes:
total 0
drwxr-xr-x 3 lewis staff 102 10 16 21:00 .
drwxr-xr-x 5 lewis staff 170 10 16 21:00 ..
drwxr-xr-x 5 lewis staff 170 10 24 14:19 origin

refs/remotes/origin:
total 24
drwxr-xr-x 5 lewis staff 170 10 24 14:19 .
drwxr-xr-x 3 lewis staff 102 10 16 21:00 ..
-rw-r--r-- 1 lewis staff 32 10 16 21:00 HEAD
-rw-r--r-- 1 lewis staff 41 10 24 14:19 master
-rw-r--r-- 1 lewis staff 41 10 24 14:19 release

refs/tags:
total 16
drwxr-xr-x 4 lewis staff 136 10 25 14:34 .
drwxr-xr-x 5 lewis staff 170 10 16 21:00 ..
-rw-r--r-- 1 lewis staff 41 10 23 18:17 1.0.1
-rw-r--r-- 1 lewis staff 41 10 24 13:42 1.0.2

可以看出:

  • refs下有3个文件夹:headsremotestags
  • refs/heads下面有masterrelease 两个文件,这是两个本地分支
  • refs/remotes下面有一个origin,这是远程仓库的名字,可以有多个远程仓库
  • refs/remotes/origin下面有3个文件:HEAD,masterrelease,即远程的HEAD和两个分支
  • refs/tags下面有2个版本号

看看每一个文件里面都放着什么吧!

1
2
3
4
5
6
7
8
9
10
11
12
13
14
➜  .git git:(master) cat refs/heads/master 
0a2602e6fef30eae8ecb627295dc53f792eb90b7
➜ .git git:(master) cat refs/heads/release
ef33acd5682467d72ec5e9f071488ea92b6ada3d
➜ .git git:(master) cat refs/remotes/origin/HEAD
ref: refs/remotes/origin/master
➜ .git git:(master) cat refs/remotes/origin/master
0a2602e6fef30eae8ecb627295dc53f792eb90b7
➜ .git git:(master) cat refs/remotes/origin/release
ef33acd5682467d72ec5e9f071488ea92b6ada3d
➜ .git git:(master) cat refs/tags/1.0.1
0b37f3e8d317258174ab6594498f3908a9a85ff4
➜ .git git:(master) cat refs/tags/1.0.2
e6b3070455b52ee005a3efb9bee46cf8579d69a6

可以看出:

  • remote的HEAD存了一个路径,指向remote的master
  • 除了HEAD文件外,其他每个文件里面存了这样一个40位的字符串
  • 本地的 master 和 远程的master存的内容是一样的,即指向了同一个对象

2.3 对象

接下来,我们看看每个对象里面都存着什么。

2.3.1 commit对象

1
2
3
4
5
6
7
8
9
10
11
12
13
14
15
16
17
18
19
20
21
22
23
24
25
26
27
28
29
30
31
32
33
34
35
36
37
38
39
40
41
42
43
44
45
46
47
48
49
50
51
52
53
54
55
56
57
58
59
60
61
62
63
64
65
66
67
68
69
70
71
72
73
74
75
76
77
78
# 1. 先查master指向的commit id
➜ .git git:(master) cat refs/heads/master
0a2602e6fef30eae8ecb627295dc53f792eb90b7
# 2. 看看这个commit里面的内容,称为commit A吧
➜ .git git:(master) git cat-file -p 0a2602e6fef30eae8ecb627295dc53f792eb90b7
tree 08405c558961bf4cd0ce14f54443e73935efd65a
parent 096c44245e9cefde2e3fe5903f983b5686e60874
author Lewis <a@b.com> 1571896152 +0800
committer Lewis <a@b.com> 1571896152 +0800

1.0.3-SNAPSHOT

Change-Id: I28e490e5fae9b0296747d82a7d892edb519b3cab
# 3. 看看这个commit的parent中的内容,叫它commit B吧
➜ .git git:(master) git cat-file -p 096c44245e9cefde2e3fe5903f983b5686e60874
tree e5617b721d22bdfb9480c80b321cdb6b3065fb5e
parent 81e1daa43c6cc0b8487af7ace2df9a79766e6247
author Lewis <a@b.com> 1571895563 +0800
committer Lewis <a@b.com> 1571895563 +0800

add scm config

Change-Id: I5b062f5475ce1907abdfd70bf432858ea46f54aa
# 4. 再看上一个commit,它是commit C
➜ .git git:(master) git cat-file -p 81e1daa43c6cc0b8487af7ace2df9a79766e6247
tree 0b7654fe8f8f85d2e1eea6fa060deff25d00d5e3
parent a925d410ed74c0e5fe86204f065b23cc9a50793c
author test a@b.com 1571819772 +0800
committer test a@b.com 1571819772 +0800

1,消除common3的依赖。
2,基于spring-boot-dependencies管理依赖。

Change-Id: Ieb865698162aa73321d2ff22d7e550bf051f7625
# 5. 再看上一个commit,它是commit D
➜ .git git:(master) git cat-file -p a925d410ed74c0e5fe86204f065b23cc9a50793c
tree 83c980d2db04066ea0039ce85df8633151043fc5
parent 24cfa38db8f33c5c4187ce608d4bef223b2e594b
author Lewis <a@b.com> 1571234523 +0800
committer Lewis <a@b.com> 1571235719 +0800

updating poms for branch'release/1.0.1' with non-snapshot versions

Change-Id: I5690493a0bcd5de37678015e319c69d333abeb9c
# 6. 看看能不能和log对应上
➜ .git git:(master) git log -4
commit 0a2602e6fef30eae8ecb627295dc53f792eb90b7 (HEAD -> master, origin/master, origin/HEAD)
Author: Lewis <a@b.com>
Date: Thu Oct 24 13:49:12 2019 +0800

1.0.3-SNAPSHOT

Change-Id: I28e490e5fae9b0296747d82a7d892edb519b3cab

commit 096c44245e9cefde2e3fe5903f983b5686e60874
Author: Lewis <a@b.com>
Date: Thu Oct 24 13:39:23 2019 +0800

add scm config

Change-Id: I5b062f5475ce1907abdfd70bf432858ea46f54aa

commit 81e1daa43c6cc0b8487af7ace2df9a79766e6247
Author: test a@b.com
Date: Wed Oct 23 16:36:12 2019 +0800

1,消除common3的依赖。
2,基于spring-boot-dependencies管理依赖。

Change-Id: Ieb865698162aa73321d2ff22d7e550bf051f7625

commit a925d410ed74c0e5fe86204f065b23cc9a50793c
Author: Lewis <a@b.com>
Date: Wed Oct 16 22:02:03 2019 +0800

updating poms for branch'release/1.0.1' with non-snapshot versions

Change-Id: I5690493a0bcd5de37678015e319c69d333abeb9c
  • 有committer和commit的信息,可以知道这是一个commit对象
  • 它有一个tree的Key
  • 它有一个parent,指向了上一个版本

2.3.2 tree对象

1
2
3
4
5
6
7
8
9
10
11
12
13
14
15
16
17
18
19
20
21
22
23
24
25
26
27
28
29
30
31
# 1. 看看commit A 指向的tree
➜ .git git:(master) git cat-file -p 08405c558961bf4cd0ce14f54443e73935efd65a
100644 blob 815e9534e349779477be0bd9599b970cd57ca0eb .gitignore
100644 blob a32e821ac5372a40846648085c0ea9be34c60260 "dpaas-common\350\257\264\346\230\216.md"
100644 blob eefea84a5d8ed7fb57f3f68a23e41c52c8adb528 pom.xml
040000 tree fe8d78f0b4e8ac1b20b08d48c3eab251e14adb03 src
# 2. commit B 指向的tree
➜ .git git:(master) git cat-file -p e5617b721d22bdfb9480c80b321cdb6b3065fb5e
100644 blob 815e9534e349779477be0bd9599b970cd57ca0eb .gitignore
100644 blob a32e821ac5372a40846648085c0ea9be34c60260 "dpaas-common\350\257\264\346\230\216.md"
100644 blob 82d60064381c6c188236ae448eccc07d917eb37f pom.xml
040000 tree fe8d78f0b4e8ac1b20b08d48c3eab251e14adb03 src
# 3. commit C 指向的tree
➜ .git git:(master) git cat-file -p 0b7654fe8f8f85d2e1eea6fa060deff25d00d5e3
100644 blob 815e9534e349779477be0bd9599b970cd57ca0eb .gitignore
100644 blob a32e821ac5372a40846648085c0ea9be34c60260 "dpaas-common\350\257\264\346\230\216.md"
100644 blob 0074e4c2834b9505c000ebcbbc9c23871b39e80a pom.xml
040000 tree fe8d78f0b4e8ac1b20b08d48c3eab251e14adb03 src
# 4. commit D 指向的tree
➜ .git git:(master) git cat-file -p 83c980d2db04066ea0039ce85df8633151043fc5
100644 blob 815e9534e349779477be0bd9599b970cd57ca0eb .gitignore
100644 blob a32e821ac5372a40846648085c0ea9be34c60260 "dpaas-common\350\257\264\346\230\216.md"
100644 blob 3cea1f762ddb91d6ff9fe7c29ab76d17152b1c31 pom.xml
040000 tree 38e6084a01011b75c5b577721d60720f7c35fef5 src
# 5. commit C 和 commit D 指向的src树比较
# commit C 的 src树
➜ .git git:(master) git cat-file -p fe8d78f0b4e8ac1b20b08d48c3eab251e14adb03
040000 tree eac04dfa6dff2ca60931abb9118048552c2a0f7a main
# commit D 的 src树
➜ .git git:(master) git cat-file -p 38e6084a01011b75c5b577721d60720f7c35fef5
040000 tree 16b6cf8627a05b28c9fd8e83b927ecfe9ca9d282 main
  • tree中记录的是它下面有哪些对象,即文件夹中有哪些文件 和 文件夹
  • 文件 和 文件夹的格式是一样的,通过权限 和 对象类型来区分
  • blob对应的是文件,tree对应的是文件夹
  • 这个tree对象指向了3个blob对象,1个tree对象
  • .gitignore文件都是同一个Key,在这4个版本中都没改过
  • pom.xml文件每个版本都不一样,说明它一直在改
  • src文件夹在commit D 到 commit C时,发生了变化,其子树只指向了一个文件夹,文件夹的名字没变,Key却变了,这说明,一个文件变化,它的N层父级文件夹全部都建了一个新的
  • 其中文件夹的040000,文件的100644很像Linux的权限,有没有?

2.3.3 blob对象

接下来看看blob对象中存了什么

1
2
3
4
5
6
7
8
9
10
11
12
13
14
15
16
17
18
19
20
21
22
23
24
25
26
27
28
29
30
31
32
33
34
35
36
37
38
39
40
41
42
43
44
45
46
47
48
49
50
51
52
53
54
55
# 这是 .gitignore 文件,里面就是文件的内容,和文本编辑器打开看到的一样,没有文件名等信息
➜ .git git:(master) git cat-file -p 815e9534e349779477be0bd9599b970cd57ca0eb
/target/
!.mvn/wrapper/maven-wrapper.jar

### STS ###
.apt_generated
.classpath
.factorypath
.project
.settings
.springBeans
.sts4-cache

### IntelliJ IDEA ###
.idea
*.iws
*.iml
*.ipr

### NetBeans ###
/nbproject/private/
/build/
/nbbuild/
/dist/
/nbdist/
/.nb-gradle/

*.class
*.log
*.gz
*.tmp
*.ctxt
*.war
*.ear
*.zip
*.tar.gz
*.rar
*.iml
hs_err_pid*
.settings
.classpath
.project
.git
.idea
.iml
.DS_Store
.svn
target
log
.mtj.tmp/
/.idea/libraries/
/.idea/
output/
target/%

2.3.4 tag对象

1
2
3
4
5
6
7
8
9
10
11
12
13
14
15
16
17
18
19
20
21
22
23
# 1. 看一个tag的Key
➜ .git git:(master) cat refs/tags/1.0.2
e6b3070455b52ee005a3efb9bee46cf8579d69a6

# 2. 查下这个Key指向了一个什么对象
➜ .git git:(master) git cat-file -p e6b3070455b52ee005a3efb9bee46cf8579d69a6
object b9704112bde683d79bbebb30a13f1b5c1b232bf5
type commit
tag 1.0.2
tagger Lewis <a@b.com> 1571895731 +0800

[maven-release-plugin] copy for tag 1.0.2

# 3. 这个对象的object又指向了什么?
➜ .git git:(master) git cat-file -p b9704112bde683d79bbebb30a13f1b5c1b232bf5
tree 153fbed953f8a8cdbb9dcbb89ae823ff33473c15
parent 728c4cfa2508a9ac839ac20c281a0c4cbe39c355
author Lewis <a@b.com> 1571895730 +0800
committer Lewis <a@b.com> 1571895730 +0800

[maven-release-plugin] prepare release 1.0.2

Change-Id: I195493aca7aa6a157b61c1e3391f27d0b53e8f4e
  • 从 tagger的信息可以知道,这是一个tag对象
  • tag对象保存了tag名称,如果tag引用被删掉了,如果tag对象还没被回收,可以从tag对象中恢复tag引用
  • tag指向了一个object,其类型为commit
  • 从commit对象的内容来看,的确是一个commit对象

2.4 tag引用

tag对象一节,我们看到了tag引用指向了一个tag对象,但这并不是必须的,tag引用可以指向任何一个对象。

1
2
3
4
5
6
7
8
9
10
11
12
13
14
15
16
17
18
19
20
21
22
23
24
25
26
27
28
29
30
31
32
33
34
35
36
37
# 1. 作为测试,我新建了一个tag 1.0.3,指向了一个commit
➜ .git git:(master) cat refs/tags/1.0.3
0a2602e6fef30eae8ecb627295dc53f792eb90b7
➜ .git git:(master) git cat-file -p 0a2602e6fef30eae8ecb627295dc53f792eb90b7
tree 08405c558961bf4cd0ce14f54443e73935efd65a
parent 096c44245e9cefde2e3fe5903f983b5686e60874
author Lewis <a@b.com> 1571896152 +0800
committer Lewis <a@b.com> 1571896152 +0800

1.0.3-SNAPSHOT

Change-Id: I28e490e5fae9b0296747d82a7d892edb519b3cab

# 2. 再建了一个tag 1.0.4,指向了一个 文件夹的版本,即tree
➜ .git git:(master) cat refs/tags/1.0.4
fe8d78f0b4e8ac1b20b08d48c3eab251e14adb03
➜ .git git:(master) git cat-file -t fe8d78f0b4e8ac1b20b08d48c3eab251e14adb03
tree
➜ .git git:(master) git cat-file -p fe8d78f0b4e8ac1b20b08d48c3eab251e14adb03
040000 tree eac04dfa6dff2ca60931abb9118048552c2a0f7a main

# 3. 再建了一个tag 1.0.5,指向了一个 文件的版本,即blob
➜ .git git:(master) cat refs/tags/1.0.5
eefea84a5d8ed7fb57f3f68a23e41c52c8adb528
➜ .git git:(master) git cat-file -t eefea84a5d8ed7fb57f3f68a23e41c52c8adb528
blob
➜ .git git:(master) git cat-file -p eefea84a5d8ed7fb57f3f68a23e41c52c8adb528
<?xml version="1.0" encoding="UTF-8"?>
<project xmlns="http://maven.apache.org/POM/4.0.0" xmlns:xsi="http://www.w3.org/2001/XMLSchema-instance" xsi:schemaLocation="http://maven.apache.org/POM/4.0.0 http://maven.apache.org/xsd/maven-4.0.0.xsd">
<parent>
<groupId>org.springframework.boot</groupId>
<artifactId>spring-boot-starter-parent</artifactId>
<version>2.1.4.RELEASE</version>
</parent>
.....
.....
.....
  • 从上面可以看出,tag只是一个引用,它可以指向任何一种对象
  • 一般来讲,它会指向 tag对象 或 commit对象
  • 有tag对象的,称为annotated tag
  • 没有tag对象的,称为 lightweight tag

3. 常用命令

3.1 初始化配置

3.1.1 init

1
2
3
4
5
# 在当前目录新建一个Git代码库
$ git init

# 新建一个目录,将其初始化为Git代码库
$ git init [project-name]

3.1.2 config

1
2
3
4
5
6
7
8
9
# 显示当前的Git配置
$ git config --list

# 编辑Git配置文件
$ git config -e [--global]

# 设置提交代码时的用户信息
$ git config [--global] user.name "[name]"
$ git config [--global] user.email "[email address]"

3.2 暂存区

3.2.1 add

1
2
3
4
5
6
7
8
9
10
11
12
# 添加指定文件到暂存区
$ git add [file1] [file2] ...

# 添加指定目录到暂存区,包括子目录
$ git add [dir]

# 添加当前目录的所有文件到暂存区
$ git add .

# 添加每个变化前,都会要求确认
# 对于同一个文件的多处变化,可以实现分次提交
$ git add -p

3.2.2 mv

1
2
# 改名文件,并且将这个改名放入暂存区
$ git mv [file-original] [file-renamed]

3.2.3 rm

1
2
3
4
5
# 删除工作区文件,并且将这次删除放入暂存区
$ git rm [file1] [file2] ...

# 停止追踪指定文件,但该文件会保留在工作区
$ git rm --cached [file]

3.2.4 status

1
2
# 显示有变更的文件
$ git status

3.2.5 diff

1
2
3
4
5
6
7
8
9
10
11
12
13
14
# 显示暂存区和工作区的差异
$ git diff

# 显示暂存区和上一个commit的差异
$ git diff --cached [file]

# 显示工作区与当前分支最新commit之间的差异
$ git diff HEAD

# 显示两次提交之间的差异
$ git diff [first-branch]...[second-branch]

# 显示今天你写了多少行代码
$ git diff --shortstat "@{0 day ago}"

3.3 对象

3.3.1 commit

1
2
3
4
5
6
7
8
9
10
11
12
13
14
15
16
17
18
# 提交暂存区到仓库区
$ git commit -m [message]

# 提交暂存区的指定文件到仓库区
$ git commit [file1] [file2] ... -m [message]

# 提交工作区自上次commit之后的变化,直接到仓库区
$ git commit -a

# 提交时显示所有diff信息
$ git commit -v

# 使用一次新的commit,替代上一次提交
# 如果代码没有任何新变化,则用来改写上一次commit的提交信息
$ git commit --amend -m [message]

# 重做上一次commit,并包括指定文件的新变化
$ git commit --amend [file1] [file2] ...

3.3.2 log

1
2
3
4
5
6
7
8
9
10
11
12
13
14
15
16
17
18
19
20
21
22
23
24
25
26
27
# 显示当前分支的版本历史
$ git log

# 显示commit历史,以及每次commit发生变更的文件
$ git log --stat

# 搜索提交历史,根据关键词
$ git log -S [keyword]

# 显示某个commit之后的所有变动,每个commit占据一行
$ git log [tag] HEAD --pretty=format:%s

# 显示某个commit之后的所有变动,其"提交说明"必须符合搜索条件
$ git log [tag] HEAD --grep feature

# 显示某个文件的版本历史,包括文件改名
$ git log --follow [file]
$ git whatchanged [file]

# 显示指定文件相关的每一次diff
$ git log -p [file]

# 显示过去5次提交
$ git log -5 --pretty --oneline

# 显示所有提交过的用户,按提交次数排序
$ git shortlog -sn

3.3.3 merge

1
2
# 合并指定分支到当前分支
$ git merge [branch]

3.3.4 rebase

1
2
3
4
5
# 合并当前分支的最近 4 次提交纪录
$ git rebase -i HEAD~4

# 基于分支的合并
$ git rebase master

3.4 引用

3.4.1 update-ref

1
2
# 安全地更新存储在ref文件中的对象的Key
$ git update-ref refs/heads/master 1a410efbd13591db07496601ebc7a059dd55cfe9

3.4.2 symbolic-ref

1
2
3
4
5
6
# 读取HEAD的引用
$ git symbolic-ref HEAD
refs/heads/master

# 设置 HEAD 引用 refs/heads/test
$ git symbolic-ref HEAD refs/heads/test

3.4.3 checkout

1
2
3
4
5
6
7
8
9
10
11
12
13
14
15
16
17
# 新建一个分支,并切换到该分支
$ git checkout -b [branch-name]

# 切换到指定分支,并更新工作区
$ git checkout [branch-name]

# 切换到上一个分支
$ git checkout -

# 恢复暂存区的指定文件到工作区
$ git checkout [file]

# 恢复某个commit的指定文件到暂存区和工作区
$ git checkout [commit] [file]

# 恢复暂存区的所有文件到工作区
$ git checkout .

3.4.4 branch

1
2
3
4
5
6
7
8
9
10
11
12
13
14
15
16
17
18
19
20
21
22
23
24
25
26
# 列出所有本地分支
$ git branch

# 列出所有远程分支
$ git branch -r

# 列出所有本地分支和远程分支
$ git branch -a

# 新建一个分支,但依然停留在当前分支
$ git branch [branch-name]

# 新建一个分支,指向指定commit
$ git branch [branch] [commit]

# 新建一个分支,与指定的远程分支建立追踪关系
$ git branch --track [branch] [remote-branch]

# 建立追踪关系,在现有分支与指定的远程分支之间
$ git branch --set-upstream [branch] [remote-branch]

# 删除分支
$ git branch -d [branch-name]

# 删除远程分支
$ git branch -dr [remote/branch]

3.4.5 reset

1
2
3
4
5
6
7
8
9
10
11
12
13
14
# 重置暂存区的指定文件,与上一次commit保持一致,但工作区不变
$ git reset [file]

# 重置暂存区与工作区,与上一次commit保持一致
$ git reset --hard

# 重置当前分支的指针为指定commit,同时重置暂存区,但工作区不变
$ git reset [commit]

# 重置当前分支的HEAD为指定commit,同时重置暂存区和工作区,与指定commit一致
$ git reset --hard [commit]

# 重置当前HEAD为指定commit,但保持暂存区和工作区不变
$ git reset --keep [commit]

3.4.6 tag

1
2
3
4
5
6
7
8
9
10
11
12
13
14
15
16
17
18
19
20
21
22
23
24
25
26
# 列出所有tag
$ git tag

# 新建一个tag在当前commit
$ git tag [tag]

# 新建一个tag在指定commit
$ git tag [tag] [commit]

# 删除本地tag
$ git tag -d [tag]

# 删除远程tag
$ git push origin :refs/tags/[tagName]

# 查看tag信息
$ git show [tag]

# 提交指定tag
$ git push [remote] [tag]

# 提交所有tag
$ git push [remote] --tags

# 新建一个分支,指向某个tag
$ git checkout -b [branch] [tag]

3.4.7 reflog

1
2
# 查看引用历史,然后用 reset 回到过去 或 未来
git reflog

3.5 远程

3.5.1 clone

1
2
# 下载一个项目和它的整个代码历史
$ git clone [url]

3.5.2 fetch

1
2
# 下载远程仓库的所有变动
$ git fetch [remote]

3.5.3 pull

1
2
# 取回远程仓库的变化,并与本地分支合并
$ git pull [remote] [branch]

3.5.4 push

1
2
3
4
5
6
7
8
# 上传本地指定分支到远程仓库
$ git push [remote] [branch]

# 强行推送当前分支到远程仓库,即使有冲突
$ git push [remote] --force

# 推送所有分支到远程仓库
$ git push [remote] --all

3.5.5 remote

1
2
3
4
5
6
7
8
# 显示所有远程仓库
$ git remote -v

# 显示某个远程仓库的信息
$ git remote show [remote]

# 增加一个新的远程仓库,并命名
$ git remote add [shortname] [url]